| Welcome, Guest |
You have to register before you can post on our site.
|
| Forum Statistics |
» Members: 714
» Latest member: HenryG
» Forum threads: 3,569
» Forum posts: 31,908
Full Statistics
|
|
|
| How about low-brow? |
|
Posted by: PhilOfPerth - 02-12-2026, 10:34 PM - Forum: Site Suggestions
- Replies (35)
|
 |
There have been some very exciting and impressive programmes written and posted on this site, and they are often fun to download and see in action. But many are too high-brow to be worked on - or even understood - by newbies.
Unless some less-technically coded items are submitted, with clear explanations of what they do and how they do it, I'm afraid there won't be many new younger or less experienced members joining us.
The Forum needs to encourage new members, and engender interest in learning a "new" language to people who have yet to wet their feet in this subject. Without this feed, the group will stagnate and eventually diminish, and even fade completely into oblivion.
There's room, and a need, for these advanced applications, but programmes don't always need all of the more complex features that are available. They should allow, and encourage, younger people to try to emulate and explore.
That's my two-cents worth, anyway.
|

|
|
| Nesting _IFF |
|
Posted by: Dimster - 02-12-2026, 10:19 PM - Forum: Help Me!
- Replies (7)
|
 |
Doesn't appear to be addressed in the wiki or KotD, but how do you nest _IIF or is that's not possible, but if it is, how deep can it be nested?
|
|
|
|
| 3D Keys |
|
Posted by: SMcNeill - 02-11-2026, 03:16 PM - Forum: Works in Progress
- No Replies
|
 |
I played around with making 3D Text earlier and couldn't get it to look like I wanted exactly. (Though @Petr did one helluva job and knocked it out of the ballpark for us!!) So, I thought I'd take a step back and try to play around with something different that I'm not so terrible with -- creating nice buttons and keys!!
These are currently set to work for keyboard keys, to replace the complicated and glitchy ones that were in my virtual keyboard. I've been working on trying to replicate the shapes of the unique keys on the keyboard -- windows command, apple option, the media keys and what not. Give this a test guys and see how it looks for a first run at it this morning. Already, there might be several little routines in here which folks might want to make use of. I really like the way the shader routine works for these buttons, and some of the buttons themselves I'm rather proud of, having made them with just simple line and circle commands.
There's a lot more to come in time, but give it a shot and see what you think so far. Am I on the right track here for something which others might find usable? Or is this getting over-engineered like I have a bad habit of doing?
I have a feeling that once I add per key highlighting and other such things, I'm going to end up making a routine with a bazillion different parameters to keep up with and pass, and I'm not entirely certain I want to get *THAT* extreme. LOL!! Test it. Kick it around. And tell me how much more complex you guys think this should/could be.
Code: (Select All)
$Color:32

Screen _NewImage(640, 480, 32)

DrawKey3D 100, 100, 60, 60, _RGB32(40, 40, 40), "up", "opt"

DrawKey3D 50, 200, 300, 60, _RGB32(50, 50, 50), "up", "SPACE"

DrawKey3D 100, 300, 60, 60, _RGB32(40, 40, 40), "up", "up"

DrawKey3D 100, 360, 60, 60, _RGB32(40, 40, 40), "up", "down"

DrawKey3D 40, 360, 60, 60, _RGB32(40, 40, 40), "up", "left"

DrawKey3D 160, 360, 60, 60, _RGB32(40, 40, 40), "up", "right"

Sleep 'I'm only going to push half my keys down so you can see them in the down state

'also decided to go with different colors so you can see the shading in action with them

DrawKey3D 100, 100, 60, 60, Red, "down", "A"

DrawKey3D 50, 200, 300, 60, Green, "down", "" 'so you can see we don't need the word for the space bar

DrawKey3D 100, 300, 60, 60, Blue, "up", "play"

DrawKey3D 100, 360, 60, 60, White, "up", "pause"

DrawKey3D 40, 360, 60, 60, Yellow, "up", "record"

DrawKey3D 160, 360, 60, 60, Silver, "up", "backspace"


Sub RoundRectFill (x As Single, y As Single, x1 As Single, y1 As Single, r As Single, c As _Unsigned Long)

    Dim a As Single, b As Single, e As Single

    Line (x, y + r + 1)-(x1, y1 - r - 1), c, BF

    a = r: b = 0: e = -a

    Do While a >= b

        Line (x + r - b, y + r - a)-(x1 - r + b, y + r - a), c, BF

        Line (x + r - a, y + r - b)-(x1 - r + a, y + r - b), c, BF

        Line (x + r - b, y1 - r + a)-(x1 - r + b, y1 - r + a), c, BF

        Line (x + r - a, y1 - r + b)-(x1 - r + a, y1 - r + b), c, BF

        b = b + 1: e = e + b + b

        If e > 0 Then a = a - 1: e = e - a - a

    Loop

End Sub


Function ShadeColor~& (col~&, factor As Single)

    Dim r As Integer, g As Integer, b As Integer

    r = _Red32(col~&): g = _Green32(col~&): b = _Blue32(col~&)

    r = r * factor: If r > 255 Then r = 255

    g = g * factor: If g > 255 Then g = 255

    b = b * factor: If b > 255 Then b = 255

    ShadeColor~& = _RGB32(r, g, b)

End Function


Sub DrawCenteredText (cx As Integer, cy As Integer, txt$, col~&)

    Dim tw As Integer, th As Integer, c As _Unsigned Long, d As _Unsigned Long

    c = _DefaultColor: d = _BackgroundColor

    tw = _UPrintWidth(txt$): th = _UFontHeight

    Color col~&, 0

    _UPrintString (cx - tw \ 2, cy - th \ 2), txt$

    Color c, d

End Sub


Sub DrawIcon (x As Integer, y As Integer, w As Integer, h As Integer, icon$, col~&)

    Dim cx As Integer, cy As Integer

    Dim As Integer scale, pad, paneW, paneH, rr, ix, iy

    cx = x + w \ 2: cy = y + h \ 2

    Color col~&

    Select Case icon$

        Case "up"

            Line (cx, cy - h \ 4)-(cx, cy + h \ 6)

            Line (cx, cy - h \ 4)-(cx - w \ 6, cy - h \ 10)

            Line (cx, cy - h \ 4)-(cx + w \ 6, cy - h \ 10)

        Case "down"

            Line (cx, cy - h \ 6)-(cx, cy + h \ 4)

            Line (cx, cy + h \ 4)-(cx - w \ 6, cy + h \ 10)

            Line (cx, cy + h \ 4)-(cx + w \ 6, cy + h \ 10)

        Case "left"

            Line (cx - w \ 4, cy)-(cx + w \ 6, cy)

            Line (cx - w \ 4, cy)-(cx - w \ 10, cy - h \ 6)

            Line (cx - w \ 4, cy)-(cx - w \ 10, cy + h \ 6)

        Case "right"

            Line (cx + w \ 4, cy)-(cx - w \ 6, cy)

            Line (cx + w \ 4, cy)-(cx + w \ 10, cy - h \ 6)

            Line (cx + w \ 4, cy)-(cx + w \ 10, cy + h \ 6)

        Case "play"

            Line (cx - w \ 10, cy - h \ 6)-(cx + w \ 6, cy)

            Line (cx + w \ 6, cy)-(cx - w \ 10, cy + h \ 6)

            Line (cx - w \ 10, cy + h \ 6)-(cx - w \ 10, cy - h \ 6)

        Case "pause"

            Line (cx - w \ 10, cy - h \ 6)-(cx - w \ 10, cy + h \ 6)

            Line (cx + w \ 10, cy - h \ 6)-(cx + w \ 10, cy + h \ 6)

        Case "stop"

            Line (cx - w \ 8, cy - h \ 8)-(cx + w \ 8, cy - h \ 8)

            Line (cx + w \ 8, cy - h \ 8)-(cx + w \ 8, cy + h \ 8)

            Line (cx + w \ 8, cy + h \ 8)-(cx - w \ 8, cy + h \ 8)

            Line (cx - w \ 8, cy + h \ 8)-(cx - w \ 8, cy - h \ 8)

        Case "record"

            Circle (cx, cy), h \ 6, col~&

            Paint (cx, cy), col~&, col~&

        Case "cmd", "command"

            ' Modern Windows logo: 4 rounded squares, scaled smaller to center nicely

            scale = 50 ' percent of icon area to use (adjust for taste)

            ix = x + (w - (w * scale \ 100)) \ 2: iy = y + (h - (h * scale \ 100)) \ 2

            w = w * scale \ 100: h = h * scale \ 100: pad = w \ 10

            paneW = (w - pad * 3) \ 2: paneH = (h - pad * 3) \ 2: rr = paneW \ 6

            RoundRectFill ix + pad, iy + pad, ix + pad + paneW, iy + pad + paneH, rr, col~& ' Top-left pane

            RoundRectFill ix + pad * 2 + paneW, iy + pad, ix + pad * 2 + paneW * 2, iy + pad + paneH, rr, col~& ' Top-right pane

            RoundRectFill ix + pad, iy + pad * 2 + paneH, ix + pad + paneW, iy + pad * 2 + paneH * 2, rr, col~& ' Bottom-left pane

            RoundRectFill ix + pad * 2 + paneW, iy + pad * 2 + paneH, ix + pad * 2 + paneW * 2, iy + pad * 2 + paneH * 2, rr, col~& ' Bottom-right pane

        Case "opt", "option"

            Dim As Integer arm, t

            scale = 50

            iw = w * scale \ 100: ih = h * scale \ 100: ix = x + (w - iw) \ 2: iy = y + (h - ih) \ 2

            cx = ix + iw \ 2: cy = iy + ih \ 2: arm = iw \ 4: t = arm / 2

            Line (cx - t, cy - arm)-(cx - t, cy + arm), col~&

            Line (cx + t, cy - arm)-(cx + t, cy + arm), col~&

            Line (cx - arm, cy - t)-(cx + arm, cy - t), col~&

            Line (cx - arm, cy + t)-(cx + arm, cy + t), col~&

            Circle (cx - arm, cy - arm), t, col~&, _D2R(0), _D2R(270) ' Top-left loop

            Circle (cx + arm, cy - arm), t, col~&, _D2R(270), _D2R(180) ' Top-right loop

            Circle (cx + arm, cy + arm), t, col~&, _D2R(180), _D2R(90) ' Bottom-right loop

            Circle (cx - arm, cy + arm), t, col~&, _D2R(90), 0 ' Bottom-left loop

        Case "ctrl", "control"

            ' Control symbol: caret-like shape

            Line (cx - w \ 6, cy + h \ 6)-(cx, cy - h \ 6)

            Line (cx, cy - h \ 6)-(cx + w \ 6, cy + h \ 6)

        Case "enter"

            Line (cx + w \ 6, cy - h \ 6)-(cx + w \ 6, cy)

            Line (cx + w \ 6, cy)-(cx - w \ 10, cy)

            Line (cx - w \ 10, cy)-(cx - w \ 20, cy - h \ 10)

            Line (cx - w \ 10, cy)-(cx - w \ 20, cy + h \ 10)

        Case "backspace"

            Dim tipX As Integer: tipX = cx - w \ 3 ' arrow tip further left than box

            Line (cx - w \ 6, cy - h \ 6)-(cx + w \ 6, cy - h \ 6) ' Top horizontal edge of box

            Line (cx + w \ 6, cy - h \ 6)-(cx + w \ 6, cy + h \ 6) ' Right vertical edge of box

            Line (cx + w \ 6, cy + h \ 6)-(cx - w \ 6, cy + h \ 6) ' Bottom horizontal edge of box

            Line (cx - w \ 6, cy - h \ 6)-(tipX, cy) ' Left slanted edges forming a true "<" arrowhead

            Line (tipX, cy)-(cx - w \ 6, cy + h \ 6)

        Case "tab"

            Line (cx - w \ 6, cy)-(cx + w \ 6, cy)

            Line (cx + w \ 6, cy)-(cx + w \ 10, cy - h \ 6)

            Line (cx + w \ 6, cy)-(cx + w \ 10, cy + h \ 6)

            Line (cx - w \ 6, cy)-(cx - w \ 10, cy - h \ 6)

            Line (cx - w \ 6, cy)-(cx - w \ 10, cy + h \ 6)

    End Select

End Sub


Sub DrawKey3D (x As Integer, y As Integer, w As Integer, h As Integer, baseColor~&, state$, label$)

    Dim As Integer r

    Dim As _Unsigned Long Top, Bottom, textColor

    r = h \ 4

    ' Auto text color (light text on dark keys, dark text on light keys)

    If _Red32(baseColor~&) + _Green32(baseColor~&) + _Blue32(baseColor~&) < 350 Then

        textColor = _RGB32(240, 240, 240)

    Else

        textColor = _RGB32(20, 20, 20)

    End If

    If LCase$(state$) = "down" Then ' Shading based on user color

        Top = ShadeColor~&(baseColor~&, 0.45)

        Bottom = ShadeColor~&(baseColor~&, 0.25)

    Else

        Top = ShadeColor~&(baseColor~&, 0.75)

        Bottom = ShadeColor~&(baseColor~&, 0.50)

    End If

    RoundRectFill x, y, x + w, y + h, r, Bottom ' Outer rim

    RoundRectFill x + 3, y + 3, x + w - 6, y + h - 6, r - 2, Top ' Inner face

    Select Case LCase$(label$) ' Draw text or icon

        Case "up", "down", "left", "right", "play", "pause", "stop", "record", "cmd", "command", "opt", "option",_

            "ctrl", "control", "enter", "backspace", "tab"

            DrawIcon x + 3, y + 3, w - 6, h - 6, LCase$(label$), textColor

        Case Else: DrawCenteredText x + w \ 2, y + h \ 2, label$, textColor

    End Select

End Sub
|
|
|
|
| QB64pe and Home Automation |
|
Posted by: dano - 02-11-2026, 03:02 PM - Forum: General Discussion
- Replies (3)
|
 |
Has anyone integrated QB64 with home automation controllers such as Hubitat, Home Assistant, etc?
I am wanting to use QB64 as the heart of home automation using a touch panel because I can get exactly what I want instead of using what they have. I can also integrate other external programs that they currently are not allowing access to.
|
|
|
|
| How to add a Poll to a Thread |
|
Posted by: Magdha - 02-10-2026, 02:43 PM - Forum: Help Me!
- Replies (2)
|
 |
It must be obvious, but I don't know how to put a poll in a thread. When you tick the "I want to post a Poll", it doesn't generate a poll form - doesn't show up in Preview Post. Do you have post the thread and add the poll later?
You can always rely on Magdha to ask the dimmest questions.
|
|
|
|
| Lighting with Maptriangle |
|
Posted by: Unseen Machine - 02-10-2026, 10:46 AM - Forum: Programs
- No Replies
|
 |
I made comments to @Petr and felt i had to back it up. I'll use it to make my 3d text variant when i get it done.
Code: (Select All)
' Unseen Machine: World-Space 3-Light Raytracer


SCREEN _NEWIMAGE(800, 600, 32)

_DELAY 0.1


TYPE Vector

  x AS SINGLE

  y AS SINGLE

  z AS SINGLE

END TYPE


TYPE LightSource

  pos AS Vector

  r AS SINGLE

  g AS SINGLE

  b AS SINGLE

  power AS SINGLE

  ambient AS SINGLE

END TYPE


TYPE Triangle

  v1 AS Vector

  v2 AS Vector

  v3 AS Vector

  r AS SINGLE

  g AS SINGLE

  b AS SINGLE

END TYPE


REDIM SHARED MyModel(1 TO 6) AS Triangle

REDIM SHARED SceneLights(1 TO 3) AS LightSource


' Global Pre-allocations for speed

DIM SHARED BakeImg AS LONG

DIM SHARED m AS _MEM

DIM SHARED step_w AS SINGLE

step_w = 1 / 63


DIM SHARED px AS INTEGER

DIM SHARED py AS INTEGER

DIM SHARED clr AS _UNSIGNED LONG

DIM SHARED w1 AS SINGLE

DIM SHARED w2 AS SINGLE

DIM SHARED w3 AS SINGLE

DIM SHARED p3x AS SINGLE

DIM SHARED p3y AS SINGLE

DIM SHARED p3z AS SINGLE

DIM SHARED lx AS SINGLE

DIM SHARED ly AS SINGLE

DIM SHARED lz AS SINGLE

DIM SHARED d2 AS SINGLE

DIM SHARED dist AS SINGLE

DIM SHARED dot AS SINGLE

DIM SHARED nx AS SINGLE

DIM SHARED ny AS SINGLE

DIM SHARED nz AS SINGLE

DIM SHARED mag AS SINGLE

DIM SHARED tr AS SINGLE

DIM SHARED tg AS SINGLE

DIM SHARED tb AS SINGLE

DIM SHARED shade AS SINGLE

DIM SHARED a AS SINGLE

DIM SHARED s AS SINGLE

DIM SHARED c AS SINGLE

DIM SHARED zOff AS SINGLE


' World-Space Vertices

DIM SHARED wx1 AS SINGLE

DIM SHARED wy1 AS SINGLE

DIM SHARED wz1 AS SINGLE

DIM SHARED wx2 AS SINGLE

DIM SHARED wy2 AS SINGLE

DIM SHARED wz2 AS SINGLE

DIM SHARED wx3 AS SINGLE

DIM SHARED wy3 AS SINGLE

DIM SHARED wz3 AS SINGLE


BakeImg = _NEWIMAGE(64, 64, 32)

m = _MEMIMAGE(BakeImg)


' --- SCENE SETUP ---

SetupLights

SetupPyramid


' --- RENDER LOOP ---

a = 0

zOff = -600


DO

  _LIMIT 60

  CLS

  a = a + 0.03

  s = SIN(a)

  c = COS(a)


  FOR i = 1 TO 6

    ' 1. WORLD SPACE TRANSFORM

    wx1 = MyModel(i).v1.x * c - MyModel(i).v1.z * s

    wy1 = MyModel(i).v1.y

    wz1 = MyModel(i).v1.x * s + MyModel(i).v1.z * c


    wx2 = MyModel(i).v2.x * c - MyModel(i).v2.z * s

    wy2 = MyModel(i).v2.y

    wz2 = MyModel(i).v2.x * s + MyModel(i).v2.z * c


    wx3 = MyModel(i).v3.x * c - MyModel(i).v3.z * s

    wy3 = MyModel(i).v3.y

    wz3 = MyModel(i).v3.x * s + MyModel(i).v3.z * c


    ' 2. CALCULATE WORLD-SPACE NORMAL

    ux! = wx2 - wx1

    uy! = wy2 - wy1

    uz! = wz2 - wz1

    vx! = wx3 - wx1

    vy! = wy3 - wy1

    vz! = wz3 - wz1


    nx = uy! * vz! - uz! * vy!

    ny = uz! * vx! - ux! * vz!

    nz = ux! * vy! - uy! * vx!


    mag = SQR(nx * nx + ny * ny + nz * nz)

    IF mag > 0 THEN

      nx = nx / mag

      ny = ny / mag

      nz = nz / mag

    END IF


    ' 3. SOFTWARE SHADER (RAYTRACE IN WORLD SPACE)

    FOR py = 0 TO 63

      w3 = py * step_w

      FOR px = 0 TO 63

        w2 = px * step_w

        w1 = 1 - w2 - w3


        IF w1 >= 0 AND w2 >= 0 AND w3 >= 0 THEN

          p3x = (wx1 * w1) + (wx2 * w2) + (wx3 * w3)

          p3y = (wy1 * w1) + (wy2 * w2) + (wy3 * w3)

          p3z = (wz1 * w1) + (wz2 * w2) + (wz3 * w3)

          tr = 0

          tg = 0

          tb = 0

          FOR li = 1 TO 3

            lx = SceneLights(li).pos.x - p3x

            ly = SceneLights(li).pos.y - p3y

            lz = SceneLights(li).pos.z - p3z

            d2 = lx * lx + ly * ly + lz * lz

            dist = SQR(d2)

            dot = (nx * (lx / dist)) + (ny * (ly / dist)) + (nz * (lz / dist))

            IF dot < 0 THEN

              dot = 0

            END IF

            shade = (dot * SceneLights(li).power) / d2 + SceneLights(li).ambient

            tr = tr + (MyModel(i).r * SceneLights(li).r * shade)

            tg = tg + (MyModel(i).g * SceneLights(li).g * shade)

            tb = tb + (MyModel(i).b * SceneLights(li).b * shade)

          NEXT

          IF tr > 255 THEN

            tr = 255

          END IF

          IF tg > 255 THEN

            tg = 255

          END IF

          IF tb > 255 THEN

            tb = 255

          END IF

          clr = _RGB32(tr, tg, tb)

        ELSE

          clr = _RGBA32(0, 0, 0, 0)

        END IF

        _MEMPUT m, m.OFFSET + (py * 64 + px) * 4, clr

      NEXT

    NEXT


    ' 4. HARDWARE RENDER

    HWBake& = _COPYIMAGE(BakeImg, 33)

    _MAPTRIANGLE _CLOCKWISE _SEAMLESS(0, 0)-(63, 0)-(0, 63), HWBake& TO(wx1, wy1, wz1 + zOff)-(wx2, wy2, wz2 + zOff)-(wx3, wy3, wz3 + zOff)

    _FREEIMAGE HWBake&

  NEXT

  _DISPLAY

LOOP UNTIL INKEY$ = CHR$(27)


SUB SetupLights

  ' WHITE

  SceneLights(1).pos.x = 0

  SceneLights(1).pos.y = 300

  SceneLights(1).pos.z = 0

  SceneLights(1).r = 1

  SceneLights(1).g = 1

  SceneLights(1).b = 1

  SceneLights(1).power = 180000

  SceneLights(1).ambient = 0.05

  ' RED

  SceneLights(2).pos.x = -300

  SceneLights(2).pos.y = 0

  SceneLights(2).pos.z = -100

  SceneLights(2).r = 1

  SceneLights(2).g = 0

  SceneLights(2).b = 0

  SceneLights(2).power = 120000

  SceneLights(2).ambient = 0.02

  ' BLUE

  SceneLights(3).pos.x = 300

  SceneLights(3).pos.y = 0

  SceneLights(3).pos.z = -100

  SceneLights(3).r = 0

  SceneLights(3).g = 0

  SceneLights(3).b = 1

  SceneLights(3).power = 120000

  SceneLights(3).ambient = 0.02

END SUB


SUB SetupPyramid

  FOR i = 1 TO 6

    MyModel(i).r = 255

    MyModel(i).g = 255

    MyModel(i).b = 255

  NEXT

  tx = 0

  ty = 100

  tz = 0

  b1x = -100

  b1y = -50

  b1z = -100

  b2x = 100

  b2y = -50

  b2z = -100

  b3x = 100

  b3y = -50

  b3z = 100

  b4x = -100

  b4y = -50

  b4z = 100

  ' Corrected Winding for all 4 sides + 2 base tris

  SetV MyModel(1), tx, ty, tz, b1x, b1y, b1z, b2x, b2y, b2z

  SetV MyModel(2), tx, ty, tz, b2x, b2y, b2z, b3x, b3y, b3z

  SetV MyModel(3), tx, ty, tz, b3x, b3y, b3z, b4x, b4y, b4z

  SetV MyModel(4), tx, ty, tz, b4x, b4y, b4z, b1x, b1y, b1z

  SetV MyModel(5), b1x, b1y, b1z, b3x, b3y, b3z, b2x, b2y, b2z

  SetV MyModel(6), b1x, b1y, b1z, b4x, b4y, b4z, b3x, b3y, b3z

END SUB


SUB SetV (t AS Triangle, x1, y1, z1, x2, y2, z2, x3, y3, z3)

  t.v1.x = x1

  t.v1.y = y1

  t.v1.z = z1

  t.v2.x = x2

  t.v2.y = y2

  t.v2.z = z2

  t.v3.x = x3

  t.v3.y = y3

  t.v3.z = z3

END SUB
Love me or hate me, but youll see this is something tasty!
John
|
|
|
|
| about Hardware Images and _DisplayOrder,Help! |
|
Posted by: qbfans - 02-10-2026, 09:59 AM - Forum: Help Me!
- Replies (11)
|
|
Hello everyone, I am working on a program about Go. Because the circle command doesn't produce good results, I am using SVG to draw the pieces and using loadimage. Here's a snippet of the code. During testing, software mode 32 works fine, but in hardware mode 33, some issues arise that I can't handle. I hope to get your help. Specifically, I directly putimage to the hardware layer and set _DisplayOrder _Hardware, _Software, so that the marks I drew on the pieces are visible. However, for my program, I need to draw something on the screen before putimage. In the code, I simply drew a filled rectangle. With this, the software layer is at the bottom by default, so the pieces are visible, but the marks on the pieces repeatedly do not show. If I set _DisplayOrder _Hardware, _Software with hardware at the bottom, the pieces are covered by the rectangle. What I don’t understand is that if I putimage without drawing the rectangle first, the marks on the pieces show up. By default, software is at the bottom in _DisplayOrder, so theoretically it should be covered by the hardware pieces. After repeated testing, I am getting more and more confused. How can I achieve the effect I want? My English is very poor, all translated by DeepL, so please forgive any mistakes. Thank you all.
Code: (Select All)
'$Console

$Color:32

Dim As String svgHeader, svgFooter, svgW, svgB

Dim As String svgBc, svgWc, finalSvgB, finalSvgW, svgDef

Dim As Long sImgB, sImgW


svgHeader = "<svg width='40' height='40' xmlns='http://www.w3.org/2000/svg'>" + Chr$(10) + "<defs>"

'white stone gradient

svgW = svgW + "<radialGradient id='simpleWhite' cx='50%' cy='50%' r='50%'>"

svgW = svgW + "<stop offset='0%' stop-color='#ffffff'/>"

svgW = svgW + "<stop offset='100%' stop-color='#dddddd'/>"

svgW = svgW + "</radialGradient>" + Chr$(10)

'black stone gradient

svgB = svgB + "<radialGradient id='simpleBlack' cx='48%' cy='48%' r='52%'>"

svgB = svgB + "<stop offset='0%' stop-color='#777777'/>"

svgB = svgB + "<stop offset='100%' stop-color='#222222'/>"

svgB = svgB + "</radialGradient>"

svgDef = svgDef + "</defs>" + Chr$(10)

svgBc = svgBc + "<circle cx='20' cy = '20' r = '20' fill = 'url(#simpleBlack)' />" + Chr$(10) ' black stone

svgWc = svgWc + "<circle cx='20' cy = '20' r = '20' fill = 'url(#simpleWhite)' />" + Chr$(10) ' white stone

svgFooter = svgFooter + "</svg>"

finalSvgB = svgHeader + svgB + svgDef + svgBc + svgFooter

finalSvgW = svgHeader + svgW + svgDef + svgWc + svgFooter

'_Echo finalSvgB

'_Echo finalSvgW

sImgB = _LoadImage(finalSvgB, 33, "memory")

sImgW = _LoadImage(finalSvgW, 33, "memory")

't& = _NewImage(800, 600, 32)

'_Dest t&

'Line (0, 0)-(799, 599), Peach, BF

'board_hw& = _CopyImage(t&, 33)

_Dest 0

'_FreeImage t&


Screen _NewImage(800, 600, 32)


'_DisplayOrder _Hardware1 , _Hardware , _Software

Do

    _Limit 30

    Line (0, 0)-(799, 599), Peach, BF

    '_PutImage (0, 0), board_hw&


    _PutImage (10, 10), sImgW

    _PutImage (10, 110), sImgB

    Line (25, 125)-Step(10, 10), Red, BF

    Color Black, 0

    _UPrintString (20, 25), "119"


    _Display

Loop Until InKey$ = Chr$(27)

Sleep

_FreeImage sImgW

_FreeImage sImgB

System
|
|
|
|
| Procedural Textures and more! |
|
Posted by: Unseen Machine - 02-10-2026, 01:25 AM - Forum: Programs
- No Replies
|
|
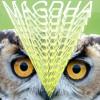
Inspired by a Youtube video i watched on the krieger engine (made in 2004 and compacted a full on FPS game into <96kb!) I got to work and figured that Perlin noise would be how I went about doing the procedural texture generation basics in a similar fashion.
Proc_Image.bi
Code: (Select All)
' MaterialEngine.bi - Header for Procedural Material Library


TYPE TexConfig

  Scale AS SINGLE

  Octaves AS INTEGER

  Swirl AS SINGLE

  Color1 AS LONG

  Color2 AS LONG

  Color3 AS LONG

  BumpDepth AS SINGLE

  SpecPower AS SINGLE

  UseWorley AS INTEGER

END TYPE


' Shared arrays for the Noise Core

DIM SHARED g_p(511) AS INTEGER

DIM SHARED gx(7) AS SINGLE

DIM SHARED gy(7) AS SINGLE

DIM SHARED HeightMap!(256, 256)

DIM SHARED C AS TexConfig
Proc_Image.bm
Code: (Select All)
' MaterialEngine.bm - Implementation for Procedural Material Library


SUB InitMaterialEngine

  DIM i%

  ' Set up the Gradient Vectors

  gx(0) = 1

  gy(0) = 1

  gx(1) = -1

  gy(1) = 1

  gx(2) = 1

  gy(2) = -1

  gx(3) = -1

  gy(3) = -1

  gx(4) = 1

  gy(4) = 0

  gx(5) = -1

  gy(5) = 0

  gx(6) = 0

  gy(6) = 1

  gx(7) = 0

  gy(7) = -1

  ' Initialize the Permutation Table

  FOR i% = 0 TO 255

    g_p(i%) = i%

  NEXT

  FOR i% = 0 TO 255

    SWAP g_p(i%), g_p(INT(RND * 256))

  NEXT

  FOR i% = 0 TO 255

    g_p(i% + 256) = g_p(i%)

  NEXT

END SUB


SUB SetMaterial (c1&, c2&, c3&)

  C.Color1 = c1&

  C.Color2 = c2&

  C.Color3 = c3&

END SUB


SUB SetNoise (s!, o%, sw!, b!, spec!, worley%)

  C.Scale = s!

  C.Octaves = o%

  C.Swirl = sw!

  C.BumpDepth = b!

  C.SpecPower = spec!

  C.UseWorley = worley%

END SUB


FUNCTION CreateAdvancedMaterial& (W%, H%)

  DIM newTex&, x%, y%, n!, clr&, shade!, spec!, nx!, ny!, nz!, lx!, ly!, lz!, dot!

  DIM sx!, sy!, mag!

  newTex& = _NEWIMAGE(W%, H%, 32)

  lx! = 0.57

  ly! = -0.57

  lz! = 0.57

  ' Height Generation

  FOR y% = 0 TO H%

    FOR x% = 0 TO W%

      sx! = Perlin!(x% * .02, y% * .02) * C.Swirl

      sy! = Perlin!(y% * .02, x% * .02) * C.Swirl

      IF C.UseWorley THEN

        HeightMap!(x% AND 255, y% AND 255) = GetWorley!((x% + sx!) * C.Scale, (y% + sy!) * C.Scale)

      ELSE

        HeightMap!(x% AND 255, y% AND 255) = GetFBM!(x% + sx!, y% + sy!, C.Scale, C.Octaves)

      END IF

    NEXT

  NEXT

  ' Rendering

  _DEST newTex&

  FOR y% = 0 TO H% - 1

    FOR x% = 0 TO W% - 1

      n! = HeightMap!(x%, y%)

      nx! = (HeightMap!((x% - 1) AND 255, y%) - HeightMap!((x% + 1) AND 255, y%)) * C.BumpDepth

      ny! = (HeightMap!(x%, (y% - 1) AND 255) - HeightMap!(x%, (y% + 1) AND 255)) * C.BumpDepth

      nz! = 1.0

      mag! = SQR(nx! * nx! + ny! * ny! + nz! * nz!)

      nx! = nx! / mag!

      ny! = ny! / mag!

      nz! = nz! / mag!

      dot! = (nx! * lx! + ny! * ly! + nz! * lz!)

      IF dot! < 0 THEN dot! = 0

      spec! = dot! ^ C.SpecPower

      shade! = 0.4 + (dot! * 1.2) + spec!

      IF n! < 0.4 THEN

        clr& = Interpolate&(C.Color1, C.Color2, n! * 2.5)

      ELSE

        clr& = Interpolate&(C.Color2, C.Color3, (n! - 0.4) * 1.666667)

      END IF

      PSET (x%, y%), MultiplyColor&(clr&, shade!)

    NEXT

  NEXT

  _DEST 0

  CreateAdvancedMaterial& = newTex&

END FUNCTION


' Internal Math Functions (Private to the BM)

FUNCTION GetWorley! (x!, y!)

  DIM xi%, yi%, minD!, dx!, dy!, d!, i%, j%

  xi% = INT(x!)

  yi% = INT(y!)

  minD! = 1.0

  FOR j% = -1 TO 1

    FOR i% = -1 TO 1

      dx! = (xi% + i%) - x! + (g_p((xi% + i%) AND 255) / 256)

      dy! = (yi% + j%) - y! + (g_p((yi% + j% + 10) AND 255) / 256)

      d! = SQR(dx! * dx! + dy! * dy!)

      IF d! < minD! THEN minD! = d!

    NEXT

  NEXT

  GetWorley! = minD!

END FUNCTION


FUNCTION GetFBM! (x!, y!, s!, o%)

  DIM gval!, amp!, f!, i%

  gval! = 0

  amp! = 1

  f! = s!

  FOR i% = 1 TO o%

    gval! = gval! + Perlin!(x! * f!, y! * f!) * amp!

    f! = f! * 2

    amp! = amp! * 0.5

  NEXT

  GetFBM = (gval! + 1) * 0.5

END FUNCTION


FUNCTION Perlin! (x!, y!)

  DIM xi%, yi%, xf!, yf!, u!, v!

  xi% = INT(x!) AND 255

  yi% = INT(y!) AND 255

  xf! = x! - INT(x!)

  yf! = y! - INT(y!)

  u! = xf! * xf! * xf! * (xf! * (xf! * 6 - 15) + 10)

  v! = yf! * yf! * yf! * (yf! * (yf! * 6 - 15) + 10)

  DIM a%, b%, aa%, ab%, ba%, bb%

  a% = g_p(xi%) + yi%

  aa% = g_p(a%)

  ab% = g_p(a% + 1)

  b% = g_p(xi% + 1) + yi%

  ba% = g_p(b%)

  bb% = g_p(b% + 1)

  DIM n1!, n2!, n3!, n4!, l1!, l2!

  n1! = GradFast!(g_p(aa%), xf!, yf!)

  n2! = GradFast!(g_p(ba%), xf! - 1, yf!)

  n3! = GradFast!(g_p(ab%), xf!, yf! - 1)

  n4! = GradFast!(g_p(bb%), xf! - 1, yf! - 1)

  l1! = n1! + u! * (n2! - n1!)

  l2! = n3! + u! * (n4! - n3!)

  Perlin! = l1! + v! * (l2! - l1!)

END FUNCTION


FUNCTION GradFast! (h%, x!, y!)

  DIM i%

  i% = h% AND 7

  GradFast! = x! * gx(i%) + y! * gy(i%)

END FUNCTION


FUNCTION Interpolate& (c1&, c2&, t!)

  DIM r%, g%, b%

  r% = _RED32(c1&) + (_RED32(c2&) - _RED32(c1&)) * t!

  g% = _GREEN32(c1&) + (_GREEN32(c2&) - _GREEN32(c1&)) * t!

  b% = _BLUE32(c1&) + (_BLUE32(c2&) - _BLUE32(c1&)) * t!

  Interpolate& = _RGB32(r%, g%, b%)

END FUNCTION


FUNCTION MultiplyColor& (c&, f!)

  DIM r&, g&, b&

  r& = _RED32(c&) * f!

  g& = _GREEN32(c&) * f!

  b& = _BLUE32(c&) * f!

  IF r& > 255 THEN

    r& = 255

  ELSEIF r& < 0 THEN

    r& = 0

  END IF

  IF g& > 255 THEN

    g& = 255

  ELSEIF g& < 0 THEN

    g& = 0

  END IF

  IF b& > 255 THEN

    b& = 255

  ELSEIF b& < 0 THEN

    b& = 0

  END IF

  MultiplyColor& = _RGB32(r&, g&, b&)

END FUNCTION
And now two demos, the first creates 5 basic textures, the second use them to create a (crappy visulisation) of them as a island in a slime swamp with a steel monolith...
Code: (Select All)
' kkrieger-Style Procedural Material Engine - Library Demo

' Uses Proc_Image.bi and Proc_Image.bm for the heavy lifting


'$INCLUDE: 'Proc_Image.bi'


InitMaterialEngine


SCREEN _NEWIMAGE(900, 600, 32)

_TITLE "kkrieger-Style Procedural Material Engine (Library Mode)"


' 1. BRUSHED STEEL

SetNoise .008, 8, 12, 15, 64, 0

SetMaterial _RGB32(20, 20, 30), _RGB32(70, 80, 110), _RGB32(210, 220, 255)

_PUTIMAGE (10, 10), CreateAdvancedMaterial&(255, 255)


' 2. CRAGGY STONE

SetNoise .03, 6, 0, 25, 4, 0

SetMaterial _RGB32(10, 10, 10), _RGB32(60, 60, 60), _RGB32(110, 110, 110)

_PUTIMAGE (310, 10), CreateAdvancedMaterial&(255, 255)


' 3. TOXIC SLIME

SetNoise .015, 3, 140, 8, 32, 0

SetMaterial _RGB32(0, 40, 0), _RGB32(50, 255, 50), _RGB32(200, 255, 200)

_PUTIMAGE (610, 10), CreateAdvancedMaterial&(255, 255)


' 4. POLISHED MAHOGANY

SetNoise .002, 4, 180, 5, 24, 0

SetMaterial _RGB32(30, 10, 5), _RGB32(90, 40, 15), _RGB32(140, 80, 30)

_PUTIMAGE (10, 310), CreateAdvancedMaterial&(255, 255)


' 5. FROSTED GLASS

SetNoise .06, 2, 5, 5, 16, 0

SetMaterial _RGB32(180, 200, 210), _RGB32(230, 240, 250), _RGB32(255, 255, 255)

_PUTIMAGE (310, 310), CreateAdvancedMaterial&(255, 255)


SLEEP

END


'$INCLUDE: 'Proc_Image.bm'
Code: (Select All)
' kkrieger-Style 3D Terrain Engine: Island of the Monolith

' Uses Proc_Image Library for all surface textures


'$INCLUDE: 'Proc_Image.bi'


' --- Setup 3D Scene ---

InitMaterialEngine

SCREEN _NEWIMAGE(1024, 768, 32)

_TITLE "The Island of the Monolith: Procedural 3D"


' --- Build the Texture Bank ---

' 1. Toxic Slime (The Sea)

SetNoise .015, 3, 140, 8, 32, 0

SetMaterial _RGB32(0, 40, 0), _RGB32(0, 255, 0), _RGB32(180, 255, 180)

DIM SHARED TexSlime&

TexSlime& = CreateAdvancedMaterial&(128, 128)


' 2. Sandy Shore (Lightened Wood Mod)

SetNoise .01, 2, 20, 2, 8, 0

SetMaterial _RGB32(160, 140, 80), _RGB32(230, 210, 140), _RGB32(255, 240, 200)

DIM SHARED TexSand&

TexSand& = CreateAdvancedMaterial&(128, 128)


' 3. Craggy Rock

SetNoise .03, 5, 0, 15, 4, 0

SetMaterial _RGB32(20, 20, 20), _RGB32(80, 80, 80), _RGB32(120, 120, 120)

DIM SHARED TexRock&

TexRock& = CreateAdvancedMaterial&(128, 128)


' 4. Monolith Steel

SetNoise .008, 8, 12, 10, 128, 0

SetMaterial _RGB32(20, 20, 30), _RGB32(100, 110, 130), _RGB32(220, 230, 255)

DIM SHARED TexSteel&

TexSteel& = CreateAdvancedMaterial&(128, 128)


' --- Generate 3D Heightmap Data ---

DIM SHARED HGrid!(40, 40)

FOR z% = 0 TO 40

  FOR x% = 0 TO 40

    ' Use FBM for height, masked by a circle to make it an island

    dist! = SQR((x% - 20) ^ 2 + (z% - 20) ^ 2)

    ' Math to sink the edges into the slime

    mask! = (1.0 - (dist! / 22))

    IF mask! < 0 THEN mask! = 0

    ' Get height from FBM math in our shared buffer

    hRaw! = GetFBM!(x% * 3.5, z% * 3.5, .04, 5)

    HGrid!(x%, z%) = (hRaw! * 180) * mask!

  NEXT

NEXT


' --- Main Render Loop ---

DO

  _LIMIT 60

  CLS

  t! = TIMER * 0.4 ' Rotation speed


  ' Draw Terrain Grid

  FOR z% = 0 TO 39

    FOR x% = 0 TO 39

      ' Biome logic: Pick texture based on average height of cell

      hAvg! = (HGrid!(x%, z%) + HGrid!(x% + 1, z%) + HGrid!(x%, z% + 1) + HGrid!(x% + 1, z% + 1)) / 4


      IF hAvg! < 12 THEN

        tex& = TexSlime&

      ELSEIF hAvg! < 35 THEN

        tex& = TexSand&

      ELSE

        tex& = TexRock&

      END IF


      ' Render the two triangles for this grid square

      DrawPoly x%, z%, HGrid!(x%, z%), x% + 1, z%, HGrid!(x% + 1, z%), x%, z% + 1, HGrid!(x%, z% + 1), tex&, t!

      DrawPoly x% + 1, z%, HGrid!(x% + 1, z%), x% + 1, z% + 1, HGrid!(x% + 1, z% + 1), x%, z% + 1, HGrid!(x%, z% + 1), tex&, t!

    NEXT

  NEXT


  ' Draw the Steel Monolith (Central Pillar)

  DrawMonolith t!


  _DISPLAY

LOOP UNTIL _KEYDOWN(27)


SUB DrawPoly (x1!, z1!, y1!, x2!, z2!, y2!, x3!, z3!, y3!, tex&, rot!)

  ' Rotate and Project 3D points

  DIM px!(3), py!(3)

  Project 512 + (x1! - 20) * 18, y1!, (z1! - 20) * 18, rot!, px!(1), py!(1)

  Project 512 + (x2! - 20) * 18, y2!, (z2! - 20) * 18, rot!, px!(2), py!(2)

  Project 512 + (x3! - 20) * 18, y3!, (z3! - 20) * 18, rot!, px!(3), py!(3)


  ' Only draw if in front of camera

  _MAPTRIANGLE (0, 0)-(127, 0)-(0, 127), tex& TO(px!(1), py!(1))-(px!(2), py!(2))-(px!(3), py!(3))

END SUB


SUB Project (ax!, ay!, az!, r!, outX!, outY!)

  ' Standard Y-axis rotation

  cx! = ax! - 512

  cz! = az!

  rx! = cx! * COS(r!) - cz! * SIN(r!)

  rz! = cx! * SIN(r!) + cz! * COS(r!) + 800 ' Z-depth offset

  ' Perspective Divide

  outX! = 512 + (rx! * 900 / rz!)

  outY! = 450 - (ay! * 900 / rz!)

END SUB


SUB DrawMonolith (r!)

  ' A 4-sided steel pillar in the center

  DIM mx!(4), mz!(4)

  mx!(1) = -15: mz!(1) = -15

  mx!(2) = 15: mz!(2) = -15

  mx!(3) = 15: mz!(3) = 15

  mx!(4) = -15: mz!(4) = 15


  FOR i = 1 TO 4

    iNext = (i MOD 4) + 1

    ' Draw pillar face (Two triangles)

    DrawPoly 20 + mx!(i) / 18, 20 + mz!(i) / 18, 400, 20 + mx!(iNext) / 18, 20 + mz!(iNext) / 18, 400, 20 + mx!(i) / 18, 20 + mz!(i) / 18, 50, TexSteel&, r!

    DrawPoly 20 + mx!(iNext) / 18, 20 + mz!(iNext) / 18, 400, 20 + mx!(iNext) / 18, 20 + mz!(iNext) / 18, 50, 20 + mx!(i) / 18, 20 + mz!(i) / 18, 50, TexSteel&, r!

  NEXT

END SUB


'$INCLUDE: 'Proc_Image.bm'
I love this field of coding so will continue to add more functions and effects but i hope you guys find it midly pleasing too.
Unseen
![[Image: Prec-Text-Gen01.png]](https://i.ibb.co/C5S6gm23/Prec-Text-Gen01.png)
![[Image: Near-perfection.png]](https://i.ibb.co/JFxzwB4k/Near-perfection.png)
|
|
|
|
| Word Clock by Fellippe Heitor |
|
Posted by: Magdha - 02-09-2026, 11:38 AM - Forum: In-Form
- No Replies
|
|

A text-based clock. The text is updated every 5 minutes, with each intervening minute indicated by asterisks.
The program uses the following InForm objects:
Form
Label
Unzip the file and extract the folder into your PEQB64 directory. In the IDE make sure that you have the Run Option “Save EXE in source folder” checked.
 Word Clock.zip (Size: 115.24 KB / Downloads: 7)
Code: (Select All)
': Project by Fellippe Heitor

': This program uses

': InForm-PE for QB64-PE - v1.5.8 based upon InForm by Fellippe Heitor

': Copyright (c) 2025 QB64 Phoenix Edition Team

': https://github.com/QB64-Phoenix-Edition/InForm-PE

'-----------------------------------------------------------


OPTION _EXPLICIT


': Controls' IDs: ------------------------------------------------------------------

DIM SHARED WordClock AS LONG

DIM SHARED ITISLB AS LONG

DIM SHARED HALFLB AS LONG

DIM SHARED TENLB AS LONG

DIM SHARED QUARTERLB AS LONG

DIM SHARED TWENTYLB AS LONG

DIM SHARED FIVELB AS LONG

DIM SHARED MINUTESLB AS LONG

DIM SHARED TOLB AS LONG

DIM SHARED PASTLB AS LONG

DIM SHARED TWOLB AS LONG

DIM SHARED THREELB AS LONG

DIM SHARED ONELB AS LONG

DIM SHARED FOURLB AS LONG

DIM SHARED FIVELB2 AS LONG

DIM SHARED SIXLB AS LONG

DIM SHARED SEVENLB AS LONG

DIM SHARED EIGHTLB AS LONG

DIM SHARED NINELB AS LONG

DIM SHARED TENLB2 AS LONG

DIM SHARED ELEVENLB AS LONG

DIM SHARED TWELVELB AS LONG

DIM SHARED OCLOCKLB AS LONG

DIM SHARED BackDots AS LONG

DIM SHARED DotsLB AS LONG


DIM SHARED Word(1 TO 22) AS _UNSIGNED _BYTE


': External modules: ---------------------------------------------------------------

'$INCLUDE:'InForm/InForm.bi'

'$INCLUDE:'InForm/xp.uitheme'

'$INCLUDE:'WordClock.frm'


': Event procedures: ---------------------------------------------------------------

SUB __UI_BeforeInit


END SUB


SUB __UI_OnLoad

    Word(1) = ITISLB

    Word(2) = HALFLB

    Word(3) = TENLB

    Word(4) = QUARTERLB

    Word(5) = TWENTYLB

    Word(6) = FIVELB

    Word(7) = MINUTESLB

    Word(8) = TOLB

    Word(9) = PASTLB

    Word(10) = TWOLB

    Word(11) = THREELB

    Word(12) = ONELB

    Word(13) = FOURLB

    Word(14) = FIVELB2

    Word(15) = SIXLB

    Word(16) = SEVENLB

    Word(17) = EIGHTLB

    Word(18) = NINELB

    Word(19) = TENLB2

    Word(20) = ELEVENLB

    Word(21) = TWELVELB

    Word(22) = OCLOCKLB

END SUB


SUB __UI_BeforeUpdateDisplay

    'This event occurs at approximately 30 frames per second.

    'You can change the update frequency by calling SetFrameRate DesiredRate%


    DIM i AS INTEGER, h AS INTEGER, m AS INTEGER

    DIM dots AS INTEGER

    STATIC prevH AS INTEGER, prevM AS INTEGER


    h = VAL(LEFT$(TIME$, 2))

    m = VAL(MID$(TIME$, 4, 2))


    IF h = prevH AND m = prevM THEN EXIT SUB


    prevH = h

    prevM = m

    switchOffAllWords


    switchOn ITISLB

    switchOn MINUTESLB

    SELECT CASE m

        CASE 0 TO 4

            switchOn OCLOCKLB

            switchOff MINUTESLB

            dots = m

        CASE 5 TO 9

            switchOn FIVELB

            switchOn PASTLB

            dots = m - 5

        CASE 10 TO 14

            switchOn TENLB

            switchOn PASTLB

            dots = m - 10

        CASE 15 TO 19

            switchOn QUARTERLB

            switchOff MINUTESLB

            switchOn PASTLB

            dots = m - 15

        CASE 20 TO 24

            switchOn TWENTYLB

            switchOn PASTLB

            dots = m - 20

        CASE 25 TO 29

            switchOn TWENTYLB

            switchOn FIVELB

            switchOn PASTLB

            dots = m - 25

        CASE 30 TO 34

            switchOn HALFLB

            switchOff MINUTESLB

            switchOn PASTLB

            dots = m - 30

        CASE 35 TO 39

            switchOn TWENTYLB

            switchOn FIVELB

            switchOn TOLB

            dots = m - 35

        CASE 40 TO 44

            switchOn TWENTYLB

            switchOn TOLB

            dots = m - 40

        CASE 45 TO 49

            switchOn QUARTERLB

            switchOff MINUTESLB

            switchOn TOLB

            dots = m - 45

        CASE 50 TO 54

            switchOn TENLB

            switchOn TOLB

            dots = m - 50

        CASE 55 TO 59

            switchOn FIVELB

            switchOn TOLB

            dots = m - 55

    END SELECT


    Caption(DotsLB) = ""

    FOR i = 1 TO dots

        Caption(DotsLB) = Caption(DotsLB) + "* "

    NEXT


    IF m >= 35 THEN

        h = h + 1

    END IF


    SELECT CASE h

        CASE 1, 13

            switchOn ONELB

        CASE 2, 14

            switchOn TWOLB

        CASE 3, 15

            switchOn THREELB

        CASE 4, 16

            switchOn FOURLB

        CASE 5, 17

            switchOn FIVELB2

        CASE 6, 18

            switchOn SIXLB

        CASE 7, 19

            switchOn SEVENLB

        CASE 8, 20

            switchOn EIGHTLB

        CASE 9, 21

            switchOn NINELB

        CASE 10, 22

            switchOn TENLB2

        CASE 11, 23

            switchOn ELEVENLB

        CASE 0, 12

            switchOn TWELVELB

    END SELECT

END SUB


SUB switchOffAllWords

    DIM i AS INTEGER

    FOR i = 1 TO UBOUND(Word)

        switchOff Word(i)

    NEXT

END SUB


SUB switchOn (this AS LONG)

    Control(this).ForeColor = _RGB32(111, 205, 0)

    Control(this).Redraw = True

END SUB


SUB switchOff (this AS LONG)

    Control(this).ForeColor = _RGB32(0, 39, 0)

    Control(this).Redraw = True

END SUB


SUB __UI_BeforeUnload

    'If you set __UI_UnloadSignal = False here you can

    'cancel the user's request to close.


END SUB


SUB __UI_Click (id AS LONG)

    SELECT CASE id

        CASE WordClock


        CASE ITISLB


        CASE HALFLB


        CASE TENLB


        CASE QUARTERLB


        CASE TWENTYLB


        CASE FIVELB


        CASE MINUTESLB


        CASE TOLB


        CASE PASTLB


        CASE TWOLB


        CASE THREELB


        CASE ONELB


        CASE FOURLB


        CASE FIVELB2


        CASE SIXLB


        CASE SEVENLB


        CASE EIGHTLB


        CASE NINELB


        CASE TENLB2


        CASE ELEVENLB


        CASE TWELVELB


        CASE OCLOCKLB


    END SELECT

END SUB


SUB __UI_MouseEnter (id AS LONG)

    SELECT CASE id

        CASE WordClock


        CASE ITISLB


        CASE HALFLB


        CASE TENLB


        CASE QUARTERLB


        CASE TWENTYLB


        CASE FIVELB


        CASE MINUTESLB


        CASE TOLB


        CASE PASTLB


        CASE TWOLB


        CASE THREELB


        CASE ONELB


        CASE FOURLB


        CASE FIVELB2


        CASE SIXLB


        CASE SEVENLB


        CASE EIGHTLB


        CASE NINELB


        CASE TENLB2


        CASE ELEVENLB


        CASE TWELVELB


        CASE OCLOCKLB


    END SELECT

END SUB


SUB __UI_MouseLeave (id AS LONG)

    SELECT CASE id

        CASE WordClock


        CASE ITISLB


        CASE HALFLB


        CASE TENLB


        CASE QUARTERLB


        CASE TWENTYLB


        CASE FIVELB


        CASE MINUTESLB


        CASE TOLB


        CASE PASTLB


        CASE TWOLB


        CASE THREELB


        CASE ONELB


        CASE FOURLB


        CASE FIVELB2


        CASE SIXLB


        CASE SEVENLB


        CASE EIGHTLB


        CASE NINELB


        CASE TENLB2


        CASE ELEVENLB


        CASE TWELVELB


        CASE OCLOCKLB


    END SELECT

END SUB


SUB __UI_FocusIn (id AS LONG)

    SELECT CASE id

        CASE ELSE

    END SELECT

END SUB


SUB __UI_FocusOut (id AS LONG)

    'This event occurs right before a control loses focus.

    'To prevent a control from losing focus, set __UI_KeepFocus = True below.

    SELECT CASE id

        CASE ELSE

    END SELECT

END SUB


SUB __UI_MouseDown (id AS LONG)

    SELECT CASE id

        CASE WordClock


        CASE ITISLB


        CASE HALFLB


        CASE TENLB


        CASE QUARTERLB


        CASE TWENTYLB


        CASE FIVELB


        CASE MINUTESLB


        CASE TOLB


        CASE PASTLB


        CASE TWOLB


        CASE THREELB


        CASE ONELB


        CASE FOURLB


        CASE FIVELB2


        CASE SIXLB


        CASE SEVENLB


        CASE EIGHTLB


        CASE NINELB


        CASE TENLB2


        CASE ELEVENLB


        CASE TWELVELB


        CASE OCLOCKLB


    END SELECT

END SUB


SUB __UI_MouseUp (id AS LONG)

    SELECT CASE id

        CASE WordClock


        CASE ITISLB


        CASE HALFLB


        CASE TENLB


        CASE QUARTERLB


        CASE TWENTYLB


        CASE FIVELB


        CASE MINUTESLB


        CASE TOLB


        CASE PASTLB


        CASE TWOLB


        CASE THREELB


        CASE ONELB


        CASE FOURLB


        CASE FIVELB2


        CASE SIXLB


        CASE SEVENLB


        CASE EIGHTLB


        CASE NINELB


        CASE TENLB2


        CASE ELEVENLB


        CASE TWELVELB


        CASE OCLOCKLB


    END SELECT

END SUB


SUB __UI_KeyPress (id AS LONG)

    'When this event is fired, __UI_KeyHit will contain the code of the key hit.

    'You can change it and even cancel it by making it = 0

    SELECT CASE id

        CASE ELSE

    END SELECT

END SUB


SUB __UI_TextChanged (id AS LONG)

    SELECT CASE id

        CASE ELSE

    END SELECT

END SUB


SUB __UI_ValueChanged (id AS LONG)

    SELECT CASE id

        CASE ELSE

    END SELECT

END SUB


SUB __UI_FormResized

END SUB


'$INCLUDE:'InForm/InForm.ui'
|
|
|
|
|

