03-14-2025, 12:42 AM
Part 4 - Maps
Ok, so far we have just been walking around in the dark. Let's look at creating an environment for our player to inhabit. We'll start by creating a map.
GX has pretty robust support for tile-based maps. What are tile-based maps? Well, they are used in many 2D games to be able to construct large worlds from a relatively small set of reusable image tiles called a tileset. For our game sample we will be using the following tileset image:

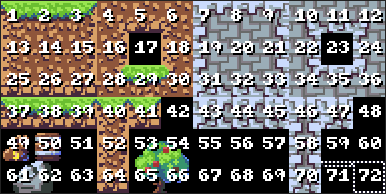
This tileset image is made up of 16x16 image tiles. Each tile in the set is assigned a number based on its position:

A map, then, is made up of a collection of these tiles arranged in a grid. If we want to create a map based on this tileset that fills the screen we can determine the dimensions of the map by dividing the screen dimensions by the tileset size. Our screen size is 256x144. Dividing this by the tileset size 16x16 we get a map that has 16 columns x 9 rows of tiles.
In order to make creating and maintaining maps a bit easier, GX includes a Map Maker application. Originally, this was built with InForm and the source is included in the GX github project. Going forward, there is a web-based version.
We'll come back to this later but first, let's look at what's involved in creating a map programmatically using the GX API. Understanding this will be important if we want to load map data from an existing source or if we want to get into more advanced procedurally generated maps. (An example of this is the Wave Function Collapse POC that I hope to get back to at some point.)
Picking up where we left off in Part 3, let's create a new method to set up our map:
The next set of calls to GXMapTile will place a tile in the map at the specified column, row and layer. The last parameter is the tile id which is derived from its position in the tileset image.
Let's call our new method after we initialize the scene:
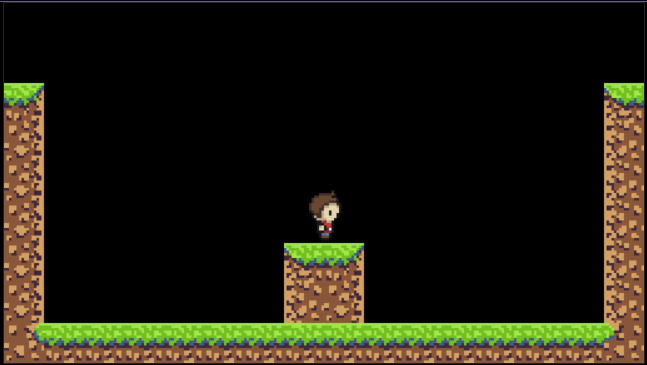
If we run the program now we'll see the beginnings of our map:

This would be a bit tedious to add an individual call to GXMapTile for every single tile in the map. So, let's add some basic map data:
Then let's update our LoadMap method to load the map tiles from our data section:
That's starting to look more interesting:

Let's add some more detail now by adding another layer of tiles. First add the additional layer data:
Then adjust the call to GXMapCreate in our LoadMap method to initialize two layers:
Here is the completed exercise:
Now we have the beginnings of an interesting environment for our player. However, there are two issues that become apparent... He can walk right through walls and seems to be floating in the air.
In part 5 we'll look at addressing this with collision detection.
Ok, so far we have just been walking around in the dark. Let's look at creating an environment for our player to inhabit. We'll start by creating a map.
GX has pretty robust support for tile-based maps. What are tile-based maps? Well, they are used in many 2D games to be able to construct large worlds from a relatively small set of reusable image tiles called a tileset. For our game sample we will be using the following tileset image:
This tileset image is made up of 16x16 image tiles. Each tile in the set is assigned a number based on its position:
A map, then, is made up of a collection of these tiles arranged in a grid. If we want to create a map based on this tileset that fills the screen we can determine the dimensions of the map by dividing the screen dimensions by the tileset size. Our screen size is 256x144. Dividing this by the tileset size 16x16 we get a map that has 16 columns x 9 rows of tiles.
In order to make creating and maintaining maps a bit easier, GX includes a Map Maker application. Originally, this was built with InForm and the source is included in the GX github project. Going forward, there is a web-based version.
We'll come back to this later but first, let's look at what's involved in creating a map programmatically using the GX API. Understanding this will be important if we want to load map data from an existing source or if we want to get into more advanced procedurally generated maps. (An example of this is the Wave Function Collapse POC that I hope to get back to at some point.)
Picking up where we left off in Part 3, let's create a new method to set up our map:
Code: (Select All)
Sub LoadMap

    GXTilesetCreate "img/tileset.png", 16, 16

    GXMapCreate 16, 9, 1


    GXMapTile 0, 2, 1, 3

    GXMapTile 0, 3, 1, 15

    GXMapTile 0, 4, 1, 15

    GXMapTile 0, 5, 1, 15

End SubThe next set of calls to GXMapTile will place a tile in the map at the specified column, row and layer. The last parameter is the tile id which is derived from its position in the tileset image.
Let's call our new method after we initialize the scene:
Code: (Select All)
...


GXSceneCreate 256, 144

GXSceneScale 2


LoadMap


...
If we run the program now we'll see the beginnings of our map:
This would be a bit tedious to add an individual call to GXMapTile for every single tile in the map. So, let's add some basic map data:
Code: (Select All)
...


mapLayer1:

Data  0, 0, 0, 0, 0, 0, 0, 0, 0, 0, 0, 0, 0, 0, 0, 0

Data  0, 0, 0, 0, 0, 0, 0, 0, 0, 0, 0, 0, 0, 0, 0, 0

Data  3, 0, 0, 0, 0, 0, 0, 0, 0, 0, 0, 0, 0, 0, 0, 1

Data 15, 0, 0, 0, 0, 0, 0, 0, 0, 0, 0, 0, 0, 0, 0,13

Data 15, 0, 0, 0, 0, 0, 0, 0, 0, 0, 0, 0, 0, 0, 0,13

Data 15, 0, 0, 0, 0, 0, 0, 0, 0, 0, 0, 0, 0, 0, 0,13

Data 15, 0, 0, 0, 0, 0, 0, 1, 3, 0, 0, 0, 0, 0, 0,13

Data 15, 0, 0, 0, 0, 0, 0,13,15, 0, 0, 0, 0, 0, 0,13

Data 28, 2, 2, 2, 2, 2, 2, 2, 2, 2, 2, 2, 2, 2, 2,30


Sub GXOnGameEvent (e As GXEvent)

...
Then let's update our LoadMap method to load the map tiles from our data section:
Code: (Select All)
Sub LoadMap

    GXTilesetCreate "img/tileset.png", 16, 16

    GXMapCreate 16, 9, 1


    Dim As Integer col, row, tile, layer

    For layer = 1 To GXMapLayers

        For row = 0 To GXSceneRows - 1

            For col = 0 To GXSceneColumns - 1

                Read tile

                GXMapTile col, row, layer, tile

            Next col

        Next row

    Next layer

End Sub
That's starting to look more interesting:
Let's add some more detail now by adding another layer of tiles. First add the additional layer data:
Code: (Select All)
...


mapLayer2:

Data  0, 0, 0, 0, 0, 0, 0, 0, 0, 0, 0, 0, 0, 0, 0, 0

Data  0, 0, 0, 0, 0, 0, 0, 0, 0, 0, 0, 0, 0, 0, 0, 0

Data  0, 0, 0, 0, 0, 0, 0, 0, 0, 0, 0, 0, 0, 0, 0, 0

Data  0, 0, 0, 0, 0, 0, 0, 0, 0, 0, 0, 0, 0, 0, 0, 0

Data  0, 0, 0, 0, 0, 0, 0, 0, 0, 0, 0, 0, 0, 0, 0, 0

Data  0, 0, 0, 0, 0, 0, 0, 0, 0, 0, 0, 0, 0, 0, 0, 0

Data  0, 0,53,54, 0, 0, 0, 0, 0, 0, 0, 0, 0, 0, 0, 0

Data  0, 0,65,66, 0, 0, 0, 0, 0, 0, 0, 0,50, 0, 0, 0

Data  0, 0, 0, 0, 0, 0, 0, 0, 0, 0, 0, 0, 0, 0, 0, 0


...
Then adjust the call to GXMapCreate in our LoadMap method to initialize two layers:
Code: (Select All)
...

    GXMapCreate 16, 9, 2

...
Here is the completed exercise:
Now we have the beginnings of an interesting environment for our player. However, there are two issues that become apparent... He can walk right through walls and seems to be floating in the air.
In part 5 we'll look at addressing this with collision detection.


